Category Archives: Food

Fig Jam

Fig Jam

We were blessed this week by a friend who gave us a bucket of figs. I decided to make jam with this windfall. It’s very easy — only 4 ingredients needed:

  • 2 Quarts of chopped fresh figs (approximately 5 lbs)
  • 6 cups sugar
  • ¾ cup water
  • ¼ cup lemon juice.

Weigh out five pounds of figs (or measure out two quarts, if you don’t have a kitchen scale). Place in a heat proof bowl or pot and cover with boiling water. Let stand ten minutes. Drain, stem and chop the figs. (Abby did the stemming, Naomi did the chopping.)

Combine chopped figs, sugar and ¾ cup of water in a large sauce pot. (I used a six-quart pot.) Bring slowly to a boil, stirring until sugar dissolves. Then cook rapidly until thick. Stir frequently to prevent sticking. Add lemon juice and cook one minute longer.

Pour the hot jam into hot jars leaving ¼” head space. Wipe jar rims and place heated lids on jars. Process in boiling water bath canner for fifteen minutes. My yield was six pints.

I love making jams because it’s the one food that I am able to can that will not disappear in a single sitting! I also love jam making because I can control the ingredients. Since I am able to avoid using pectin unless it is truly necessary, my jams have a more concentrated fruit flavor. Also, I use real sugar, not corn syrup, which is a very common ingredient in commercially prepared jams.

Click for PDF version

Leave a Comment

Filed under Food

Homemade Strawberry Ice Cream

Strawberry ice creamSince we keep goats for the milk they give us, and since milk production is highest in the spring shortly after the goats freshen, for the past several months I’ve been on a perpetual quest for Ways To Use Up Goat Milk. Drinking it, using it in cereal, baking and cooking — rice pudding, chocolate pudding, potato soup, pancakes; making yogurt and kefir and cheese. Still our milk refrigerator is bursting at the seams. So the quest continues.

A parallel quest this month is to buy as little food from the store as I can, and to eat as much as possible from our pantry, freezer, garden and animals (eggs, milk). I do have to supplement with some fresh produce, since my garden does not yet provide enough to meet our our needs; but my aim is to eat up all the random partial packages or small amounts of meats that are harder to make a meal from. Anyway, I have some strawberries that I froze, and a few bags of ice that I wanted to use up from the freezer.

Enter ice cream!

Old-fashioned ice cream makerI happen to have a very old, cool (pun intended?) ice cream maker that I got at a garage sale for FREE! I can make six quarts of ice cream at a time, so no one is left out. I love it. I used to have a Cuisanart ice cream maker like this one which was also super cool, but it only made about 6 cups of ice cream at a time…. At some point along the way, that was just not enough ice cream for our growing family; so I donated it. I was thrilled when I found this larger one.  Similar style large machine here.

One of the things we made during our “kitchen day” yesterday was ice cream. Strawberry ice cream. Perfect recipe to use up the strawberries and goat milk, and also use up the extra bag of ice. This recipe makes a lot, but you can halve or quarter it to fit the size of your ice cream maker.

There are lots of possibilities for variation on this recipe! You can substitute other soft fruits for strawberries. Or omit the fruit and add an extra tablespoon of vanilla for old-fashioned vanilla ice cream. Or add chocolate chips and peppermint extract instead of fruit. You get the idea. Just be sure to add your “mix-ins” first, and adjust the amount of milk to bring the mixture up to the fill line on your ice cream maker.

Strawberry Ice Cream

  • 4 eggs
  • 2½ cups sugar
  • 4 cups whipping cream
  • 1 T vanilla
  • ¼ tsp salt
  • 2 cups coarsely pureed strawberries.
  • approximately 4 cups of milk (I used goat, but cow milk is fine)

In a large mixing bowl, beat eggs until foamy. Gradually add sugar; beat until thickened. Add cream, vanilla and salt. Mix thoroughly. Refrigerate mixture until well chilled.

Puree strawberries so that they are mostly liquid with some texture. Refrigerate.

Pour chilled ice cream mixture into freezer can. Add strawberry puree. Then add milk until the mixture level reaches the max fill line. Freeze according to the directions for your ice cream maker. Makes approximately 1 gallon of the most delicious ice cream imaginable.

Click here for a printable version

Leave a Comment

Filed under Food

Refrigerator Dill Pickles

pickles
These pickles are delicious. Crisp, garlicy, flavorful, sour. Everything I want in a pickle. But the best thing is, they are a cinch to make. Let me show you how.
Vinegar and saltPlace 7 cups of water, 1 cup white vinegar and 1/4 cup canning salt (or any salt without additives — if you use a salt with additives, the brine will be cloudy) in a saucepan and bring to a boil.

While the brine is heating, wash 4 lbs of pickling cucumbers and some fresh dill.

Grab a gallon sized jar or crock (it’s OK to repurpose one) or buy one here or here.

Place large handful of dill in the bottom of the jar. You want to cover the bottom with a nice thick layer.

Dill and garlic

Peel one clove of garlic (or more according to your taste) and cut into about 4 pieces. Add to jar on top of dill.

Pack them in!Cut the ends off of the cukes and tightly pack in the jar on top of dill and garlic. Use all your expert packing skills on this. Cram, wedge, shove to make them all fit. They will!
Pickling spice on topPour the now boiling vinegar mixture over top of the tightly packed cukes. Add 1/2 teaspoon pickling spice to the jar.
The wait begins Place a plate, saucer or another jar on top of the cukes in the jar to force them to stay down under the brine. Leave the jar at room temperature for 3 days. These 3 days may possibly be the hardest three days of your life. After your 72 hour waiting period, refrigerate or DIG IN!

You can also slice the cukes or cut them in spears. If you do, they will fit in a smaller jar. I fit 3.25lbs of cukes cut into spears in a 1/2 gallon jar.

If you are local to me and want to make pickles, hit me up for some pickling spice. It will take me 10 years to use up the amount I bought. I’d be happy to share.

Click here for a PDF version

Pickles-to-be

2 Comments

Filed under Food

Zucchini Jam

Stephen, with a ZOUS (zucchini of unusual size)

Stephen, with a ZOUS
(zucchini of unusual size)

It’s July. Which means, if you are a gardener, that you probably have more zucchini than you know what to do with. (And if you are not a gardener, that you have probably been gifted someone’s excess.) Zucchini bread, zucchini fritters, steamed zucchini, skewered zucchini, stuffed zucchini and zucchini jam. Yes, I said zucchini jam! I came across this recipe on an email group for moms of big families and I modified it a bit to suit our family’s preferences. I will explain a little bit about canning jam after the recipe.

Zucchini Jam

Peel a large zucchini. You can use the biggest monster zucchini you can find. Scoop out the seeds. Put the flesh through a food processor, or finely shred using a hand held grater. I process all my extra-jumbo zucchini at once and then divide up the shreds into 6 cup portions and freeze what I won’t be using right away, in freezer bags, for future jam making sessions.

Cook 6 cups peeled, shredded zucchini with 1/4 cup water until translucent.

Add:

  • 6 cups sugar
  • 1/2 cup bottled lemon juice
  • 1 cup fruit of choice

Bring to a boil. Boil 10 minutes, stirring occasionally.

Remove from heat. Add one 6-oz or two 3-oz packages of flavored gelatin (i.e., Jello)

Stir well to combine.

Pour into clean, hot Mason jars, leaving 1/4″ head space. Wipe rims of jars. Add lids and rings. Process in boiling water bath for 10 minutes, or store the jam in the refrigerator. Or, do what I do and turn the sealed jars upside down on a towel for 1 hour. Turn right side up and leave to cool for 12 to 24 hours. Yield: About 8 cups.

There is a lot of flexibility in this recipe. Choose whatever fruit you have on hand, and then select a flavor of jello to match or complement the flavors. For example: Strawberries and strawberry jello, Strawberries and peach jello, strawberries and orange jello, orange pulp and orange jello. Chopped peaches and raspberry jello, Pineapple and lemon jello. There are many possibilities.

Just in case it freaks anyone out that I don’t always process my jam in a water bath, I will explain currently recommended protocol and why I choose not to follow it for jams and jellies intended for my own family’s consumption. First, my reasoning for skipping the water bath for jams: I happen to have personally observed canners from previous generations doing things this way. The “old-fashioned” way. With no ill effects.

Actually, my mom used to use plain jelly jars, the kind that don’t have threaded tops for lids. She put jam in them, topped with paraffin wax. The jam contains so much sugar that it is rare to have any sort of spoilage. In 20+ years of canning, I have never had any spoilage in jams and jellies. Because I am careful to avoid contamination, doing it this way is within my comfort level. It saves me time and keeps my house cooler. I inspect the jars upon opening, and we go through jars of jam in this house like nobody’s business, so they don’t sit around very long.

If I intend to give the jam as I gift, I do process it in a water bath because I have no control over the manner in which it is stored, or for how long, once it leaves my home. Educate yourself on canning protocol and decide for yourself your comfort level. I will list a few resources that I have found helpful at the end of this post. But nothing beats learning hands-on from an experienced canner.

Quick canning overview

Zucchini jam

Zucchini jam

There are two ways to process home canned food: water bath and pressure canning. The water bath method is used for high acid and high sugar foods. Fruits, jams, jellies, pickles, and tomatoes are all safe to process using the water bath method. The pressure method is used for vegetables, meats, soups, chili, salsa, spaghetti sauce, etc.

Both methods use the same preparations techniques. One must wash the canning jars and keep them hot. This can be done by running them through the dishwasher, simmering them in a large pot on the stove or placing them in a warm oven. The two piece lids/rings must be placed in a pot and brought to a simmer. Prepared food is ladled into jars (usually done hot, but sometimes cold or room temperature with boiling water poured over). Any air bubbles are forced out of the jars by running a spatula or non metal knife around the inside edge of the jar. The jar rim is wiped clean with a sterile (boiled) cloth. The lid is placed on the jar and tightened down with a ring. There is a handy magnet tool for removing the lids from the pot of simmering water.

For water bath canning, the jars are then placed in a large kettle/pot of boiling water that has a rack on the bottom to keep the jars from direct contact with the bottom of the pan. Water is added to the pot after the jars are in place until the water level is above the tops of the jars. The jars must remain covered in boiling water for the entire time of processing.

For pressure canning one needs a pressure canner, which is a large pressure cooker designed for canning. A small amount of water is added. (There are usually markings on the pot to indicate how much water to add.) The jars are loaded into the canner (again, on a rack to keep the jars from direct contact with the pot). The lid of the canner is placed tightly on the pot and heat is turned up on the pot to bring it up to the desired pressure. I have used both a dial gauge and a weighted gauge to regulate what pressure I need to cook at. I vastly prefer the weighted gauge. With the dial gauge, you have to be right there looking at to to be sure it stays at the proper pressure; but the weighted gauge makes a sound, so I can be busy doing other things while the food processes and still oversee the operation. Once the correct pressure is reached, it is simply a matter of maintaining that pressure for the amount of time needed to safely preserve the chosen food. Then the pressure is allowed to reduce slowly (no quick release). The times and pressures for various foods are found in the Ball Blue Book and other canning resources.

When the processing time for either method is complete, jars are removed with canning tongs and placed on a towel or other stable, heat-proof surface and allowed to sit until completely cool. One of the most satisfying sounds ever is the “ping” from the lid of a home canned jar as it cools and seals. Once cool (usually 12-24 hours later), you gently remove the rings from the jars. Wipe the jars off if necessary. Check that they actually sealed by observing whether the middle of the dome lid has pulled down. Any jars that didn’t seal should either be reprocessed, or refrigerated and used promptly. Label and store the sealed jars in your pantry until needed.

Canning Resources

Facebook groups

  • Canning Granny
  • Canning
  • Canning & Preserving For Christians

Click here for a printable version of this recipe.

13 Comments

Filed under Food

Bread baking – French Bread

Bread

I love to bake bread… specifically yeast breads. When I was a child, my mother made the most amazing cinnamon rolls. About the time I was 10 or 11 years old, I was determined to learn how to make them myself. My mother, wonderful woman that she is, took the time to teach me. Thus began a lifelong love affair with bread baking. In our home, we make all of our sandwich bread and many other bread products as well.

There are a number of reasons I can think of for baking your own bread.

It saves money. I can bake a loaf of bread using high quality ingredients for about 1/2 the cost of the least expensive loaf of bread from the grocery store.

It saves time. This won’t be true for everyone, but as a stay at home mom, I’m here at home to oversee the process of baking bread…. It takes me less time to make a loaf of bread than it would take to run to the store to buy one.

There is no denying the enjoyment of freshly baked bread. The aroma of bread baking is intoxicating. And a slice of fresh, warm bread with butter is heavenly. I like to give gifts of homemade bread. It is always well received. When ever I bring a meal to a new mom or someone going through a rough time, I try to include homemade bread. From the feedback I receive, I have come to believe that homemade bread is truly comforting.

I like that I have total control of the ingredients in my bread. Only want to use organic products? No problem. Avoiding dairy? No problem. Need extra fiber? No problem.

It’s a great way to experiment with new flavors and textures. Dense and chewy to soft and fluffy, sweet to spicy to savory. All are possible.

Still, in spite of these benefits, many people have never tried baking bread. There are a couple of reasons I’ve heard expressed over and over. One is time. It’s true. Bread baking start to finish takes between 1.5-3 hours depending on a variety of factors. However, this is NOT 1.5-3 hours of work. There is a difference. It is about 20 minutes total of hands on work broken into 3-4 smaller chunks of time with the rest of the time being rising time and baking time. This is totally doable for a busy mom.

Another concern is that bread baking is complicated or exacting. Not true. There is a learning curve with anything, but now with all the tutorials available online you can have your own personal teacher available at your beck and call. Bread dough is extremely forgiving. Take the time to learn what your dough should look and feel like. Everything else will fall into place. Along with this is just the uncertainty of the process. That is what I aim to teach today as I show you the process of making…..

French bread.

Combine:

2 1/2 C warm water (around 105° F)
2-1/2 C warm water (around 105° F)

4 t sugar
5 t yeast (I prefer SAF brand found at Smart and Final)
Let sit 5-10 minutes or until bubbly.

Then add:
2 T olive oil
1 T salt
7 C flour
2 T olive oil, 1 T salt, 7 C flour
Ingredients mixed, but not kneaded.

Knead for 6-8 minutes in a Kitchen Aid or similar mixer (I use a Bosch Universal) or 8-10 minutes by hand.
Knead for 6-8 minutes in a Kitchen Aid or similar mixer or 8-10 minutes by hand.
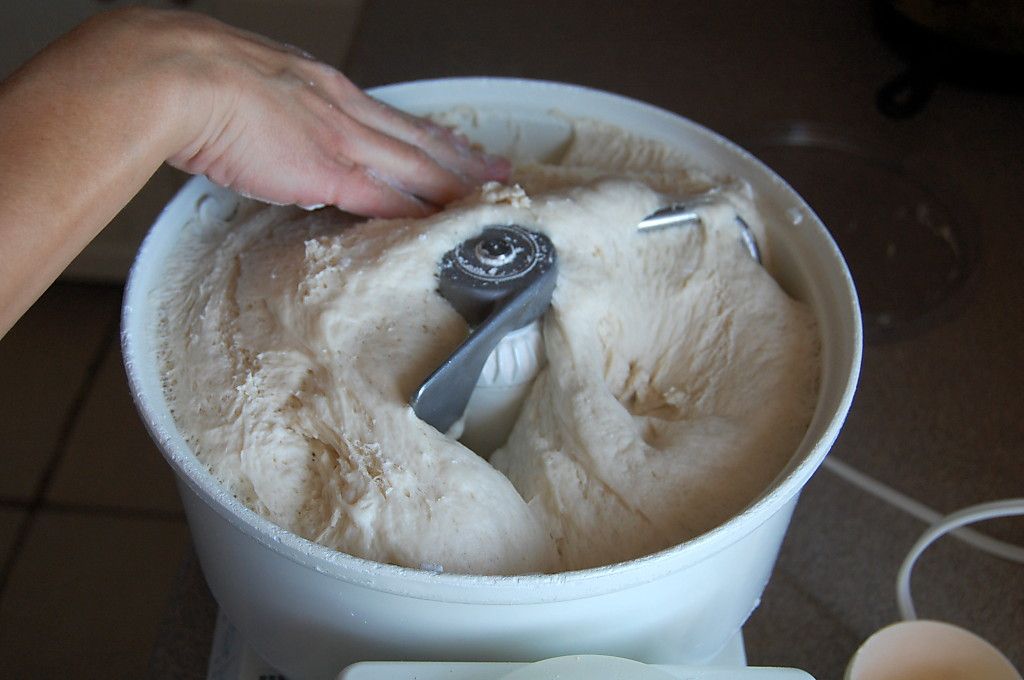
After kneading. Notice the texture difference in the dough between this picture and the previous one.

Let rise in bowl until doubled in size (about 1 hour).
Let rise in bowl until doubled in size (about 1 hour)

Punch dough down.
Punch dough down (1) Punch dough down (2) Punch dough down (3)

Divide dough in half. Put dough on floured surface and let rest for 10 minutes.

before the 10 minute rest

after the 10 minute rest

While the dough is resting, grease a French bread pan and sprinkle with cornmeal. If you don’t have a French bread pan, just use a 9×13 cake pan and lay your loaves side by side. The shape will be different but it will still taste yummy.
Grease a French bread pan and sprinkle with cornmeal

Shape into French bread shape. I do this by rolling out each ball of dough until flattened then rolling it up and tucking in the ends. There is not really a right or wrong way to shape. Just what works for you.
Shape into French bread shape (1) Shape into French bread shape (2) Shape into French bread shape (3)

Place in your prepared pan.
Place in your prepared pan

Cover with a towel and let rise until nearly double. About 30 minutes.

Very carefully slash the risen loaves with a very sharp knife. If you press too hard, the loaves will deflate.
Very carefully slash the risen loaves with a very sharp knife

Bake in a 375° F oven for 20-25 minutes or until browned.
Bake in a 375° F oven for 20-25 minutes or until browned

Remove from pan to cooling rack after about 5 minutes.
Remove from pan to cooling rack after about 5 minutes

Wait to cut into the loaf for at least 30 minutes. I know it is hard, but if you don’t wait, the bread won’t be able to stand up to the pressure of the knife and your bread will get squished.
Wait to cut into the loaf for at least 30 minutes

If you divide the recipe in half and make a single loaf, you can use a bread machine to knead the dough and then remove it to bake in the traditional oven.

Above all, enjoy the process. And, of course, the finished product.

Click here for a printable version of this recipe.

4 Comments

Filed under Food